Tuesday, December 25, 2012

My Christmas Story with Foods

Now, it is beginning of Christmas story...it is not like the movie "The Christmas Story". I am just talking about my cooking on Christmas day that I enjoyed it a lot. Because cooking the ham is so much easier than the turkey, because it take longer to cook than the turkey...however it is up by the weight of it. I ended up bough 10 pound of ham compare to 4 pound of turkey. But I love the ham because of the glazed. Also I do make other dishes as well. I really enjoy it a lot. The foods were delicious and also the family like it a lot.

This is the green bean casserole that caused my mom to love it even more...


The rolls, which are my favorite...


The stuffing that are going into stuffing ball. I make two different kinds of stuffing ball. One had the celery, parsley, and onion in it, also I add the cranberry in it. The other one had apple and cranberry in it. My family like it. 


This is Cheddar Mashed Potato casserole, this is the only the most funny thing ever happen. I know that I add too much in this dish. However, I was considering because it will might caused overflow when baking in the oven. So I decided to go for it. I baked it for 30 minutes, (it was supposed to be) But after 15 minutes, it was overflow and caused a lot of smoke. So I had to take it out early. The fire alarm had been going off for like 15 minutes. We had to have all the three doors open to get the smoke out. But this dish ended up really good. 


The stuffing balls are ready to be cook in the oven...


The beer-honey glazed Ham...it is so good...


The green bean, as after it was done cooking.


Now, at last...the dessert that I make is Eggnog Cheesecake...Yummm!


So that is my Christmas story with the food. I am glad that it ended really good. 

Saturday, December 22, 2012

The Whole Part of Cross-stitch

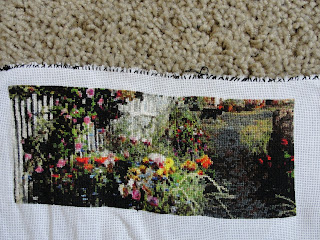
It came at last that I have finished the whole part of the cross-stitch. It took me a year and two months to finish the whole thing. If I did not attend to school, then this cross-stitch could be finish in October. But I am glad that I did went to school. But there is one little part that I had to finish first to complete the whole thing. I did this part 18 on December 19th and finish on December 22, 2012.

Here is the image of part 18 of cross-stitch


And now, I had to sew to put in together and it came look really great. Here is the final of whole cross-stitch that I am proud of...


Also it look same from this image of the cross-stitch


So I will frame of my proud work that I have done for a year and two month...

Wednesday, December 19, 2012

Finally, the Cross-stitch Part 17

Ah! Finally, I started to finish up the part 17 of cross-stitch. I know it had been a while. I had to put on hold because I was in school and nearly had no time to do the cross-stitch. So now, I am on winter break for three weeks. I have decided to take the opportunity to finish it up. It was only little part and easier to do to get it finish. I have start this part 17 on September 29 and it was put on hold on October 4th. However I started a little because I was on Thanksgiving break, so I started on November 19th and then again I put on hold to finish up the last three week of school. I put on hold on November 24th and start again on December 12, 2012. As now I have finish today with all of the cross-stitch part 17.

Here is the part 17 of it...


Here is the whole thing of the bottom before I will rejoin the rest of it.


But right now, I have one more part that will be add. I have the feeling that it could be finish in a week or so. Just keep eye for the final result of the cross-stitch.


Friday, November 23, 2012

Oh Yummy! Pumpkin Cheesecake Pie

Tired of old same pumpkin pie? Just want the pumpkin pie to taste different but still like the pumpkin pie? Here is the idea of Pumpkin Cheesecake pie...

Before the Thanksgiving came, I was doing research on many different things. I want to do something different for this pumpkin pie. I do love the traditional pie but I decided to do something different this year with little of new kind. I came across to this recipe that I found on this website "Taste of the Home", after I read it and it sound really good. I know that this recipe is required a lot of cream cheese. I thought that they were nut to have that many of cream cheese. But lucky in the store, they were on sale so I took the chance of that. Here is the website for this recipe... Deluxe Pumpkin Cheesecake

So I just go ahead and write it down for you because I did it little different way but it is mostly same things.

Pumpkin Cheesecake

Ingredients

  • Two graham ready pie crust
  • 4 packages (8 ounces each) cream cheese, softened, divided
  • 1 1/2 cups sugar, divided
  • 2 tablespoons cornstarch
  • 4 eggs
  • 2 teaspoon vanilla extract
  • 1 cup canned pumpkin
  • 2 teaspoon ground cinnamon
  • 1 1/2 teaspoon ground nutmeg


Directions

  1. In a large bowl, beat 1 package of cream cheese, ½ cup sugar and cornstarch until smooth, about 2 minutes. Beat in remaining cream cheese, one package at a time until smooth. Add remaining sugar and vanilla. Add 4 eggs; beat on low speed just until combine. (If you don't have mixer, you can use by hand mixer, I suggest you to use whisk and act like machine)
  2. Place 2 cups filling in a small bowl; stir in the pumpkin, cinnamon, and nutmeg. Remove ¾ cup pumpkin filling; set aside. Pour remaining pumpkin filling over crust; top with remaining plain filling. Cut through the knife to swirl. Drop reserved pumpkin filling by spoonful over cheesecake; cut through with a knife to swirl.
  3. Place the pan in a large baking pan; add 1 in. of hot water to larger pan. Bake at 350 degree F for 55 to 65 minutes or until center is just set and top appears dull. Remove the pan from water bath. Cool on a wire rack for 10 minutes. Carefully run a knife around edge to pan to loosen; cool 1 hour longer. Refrigerate overnight. 


You can add chocolate syrup or whipping cream, or anything on the top of the pie of your taste. Enjoy it!


Thursday, November 22, 2012

My Thanksgiving Story

Let me tell you the story of My Thanksgiving Dinner. This is my very first time to cook Thanksgiving dinner for the family since I started at Culinary Arts school to become Chef. Also I have asked my mom for several year to let me cook Thanksgiving dinner as the whole things. I did cook some on Thanksgiving dinner but it was only like one side of it. Right now, I cooked the whole dinner. It was good experience for me and I would like to do it more. Let my story begin...

At 9:00 am, I woke up because I really want to start cooking the dinner and plus I couldn't sleep anymore. So I started to prep at 9:15 am which is the rolls, because it take 2 to 4 hours to rise.


Then I started on the turkey, because it take time to cook than the rolls. I started to prep the seasoning for the turkey. I used brown sugar and butter to smear on it, as before I started to bake it.


I began to prep the glazed for the turkey. I used brown sugar, butter, nutmeg, cinnamon  and rum. It take a while to cook to become syrup-like.
After that, I began to prep the appetizers because the dinner won't be ready for another two hours. So I decided to prepare the appetizer, I made Tomato bruschetta with baked bread with mozzarella cheese on top of it. We began to eat the appetizer at 11:30 am, as while the turkey is cooking and I kept baste it.
After, I began to become crazy because at 12:15 pm, the turkey was finished. I have not started the sides yet. So I had to rush everything in 30 minutes. I began to prep the green bean casserole, rolls, and stuffing ball and put on the oven at once.
Stuffing Ball
 Rolls
Green Bean Casserole

While they were cooking in the oven, I began to prep the mashed potatoes and after it was finished simmer. Then I had to mashed them. However, I totally forgot to cook the bacon. I quickly took it out and put in the oven for 10 minutes. It is faster that way than the stove or microwave. As the results that it came out really good. 

So the feast begin with this beautiful setting of the table with wonderful family.


After the great feast, I begin to clean up the kitchen and dining room. It just took forever to do that it because I was being to slow and take my time. After I finished all of them, I began to make the dessert. I was making the pumpkin cheesecake for the very first time. I put in the oven and cook for almost an hour. Here is the result of pumpkin cheesecake...


I finished my cooking and cleaning at 4:30 pm. It had been long time for me to do everything but it was good experience for me. Now, I am tired but I would love to do it again. 

(Keep eye for tomorrow because I will post the Pumpkin cheesecake recipe for anyone who is interesting)

Monday, November 12, 2012

My infamous Chili

You know when it is really cold outside or cold inside that you really want to turn on the heat but really want to save it for later on. Also it was snow outside all weekend and now it is stop. I don't like the snow very much. It is not my favorite thing of all. Yes, I know it is pretty but I dislike to drive in it. Anyway, this cold weather made me want to bring out my most favorite soup which is Chili. There are so many different kind of chili that you could make. I decided to make my own chili with my little inspire of my invention for this. I called this Black Bean Chili. For some reason, I just love black bean so I decided to make this. Here is my recipe that I want to share with you. It is very easy and simple that is not required a lot of time. Because you are going to cook it in crock pot. Here is my recipe:

Black Bean Chili (Yield: 4 servings)
Ingredients:

  • 1 can of black bean
  • 1 can of chili-ready bean
  • 1 onion, 1/4 inch dice
  • 1 small can of tomato sauce
  • 2 small can of tomato paste
  • 1 can of tomato, diced (I recommend fire-roast tomato)
  • 1 lb of ground beef/turkey/ or any
  • chili powder for tasting
  • to taste = salt and pepper


Directions

  1. Cook the ground beef first to brown it. Remove the ground beef as drain the fat. Saute the onions until soft or little of brown in little bit of fat. Add the ground beef and then add tomato paste. Cook for 3 to 4 minutes. 
  2. Add the black bean, chili-ready bean, tomato sauce, tomato diced in the crock pot. Mix well. Then add the ground beef/onion/tomato mixture in the crock pot. Cook in low heat and cook for 6 to 8 hours.
  3. Add the chili powder, salt, and pepper to correct the flavor in chili.


You can add the cheese to it or making the cornbread. It is all up to you. Enjoy!

Saturday, October 6, 2012

Most Declioius cake ever!

I came to craving for pumpkin since it is fall season. I always love pumpkin. I could make everything with it. But I know that I have my limit because it only come once a year from October to November. As right now, I want to make something different. I often make pumpkin cookie and pumpkin bread. I just want to make something different. I came across to this recipe called "Pumpkin Crumb Cake". It sound good, but I don't want to add the nuts on the top. Here is the recipe if you like the nuts with it. Here it is: Pumpkin Crumb Cake . So I created a little bit of my own without the nuts and I have add with crumb topping on it. It end really good. So it is almost like Pumpkin Coffee Cake but just a little. Because I add little bit something different in the topping. So here is my recipe for it....

Pumpkin Crumble Cake

Ingredients
- 1 box of yellow cake
- 1 can (15 oz) pumpkin puree
- 1 can (12 oz) evaporated milk
- 3 large eggs
- 1 1/2 cup sugar
- 1/2 teaspoon cinnamon and/or pumpkin pie spice (I add both of them)
- 1/2 teaspoon salt

Topping
- 1 cup flour
- 1 cup brown sugar
- 1/2 cup butter

Directions
1. Preheat oven at 350 degree. Grease the 9 x 13 pan.
2. In a large bowl, combine pumpkin, evaporated milk, eggs, sugar, pumpkin pie spice, cinnamon, salt. Mixed well, and spread into prepared pan. In small bowl, mix flour, brown sugar, and butter with fork and mix well to become crumble
3. Sprinkle the cake mix over the top of the pumpkin mixture and pat down. Sprinkle the toppings evenly over the cake mix.
4. Bake for 60 minutes or until done. (I know that it is long time, but it will make your house smell really good)

So enjoy it as much as you can! (I know that my picture doesn't look good)


Friday, September 28, 2012

At Last...Cross-stitch Part 16

At last...that I finished the cross-stitch part 16. I mean I started this part on August 2nd. I was sewing it up as much as I could. Then I put on hold because I was going back to school. So I put my cross-stitch part 16 on hold on August 20th. I did not start again until September 21. That is a month, because I was in school for five weeks. I barely have time to do the cross-stitch. Because I had so many homework to do. Also big plus, I had job where I work with my clients. That include as no time for the cross-stitch. Lucky enough, I was on break from school for a week as Fall break. I tried enough to finish it up. Now, I finally finished my cross-stitch part 16 today. It is not completely yet, because I have two more part to go. So it look like it won't be finish until the end of the year or until February or March, but who know.

Here is the cross-stitch part 16


Again, for refresh your mind what it will look like when I am completely with two more parts.


I know this is third blog already...I mean I haven't blog for a month. That mean I won't be able to blog for a while because I will be in school for 11 weeks with little crazy schedule...


Thursday, September 27, 2012

Pumpkin stuffed shells

Craving for Pumpkin?

Me too!

Soon in the first week of October, I have to start to buy the pumpkin, not the canned. Fresh pumpkin, because I just want the seeds. I truly love to eat seeds that only when you roasted it. Right now, I am thinking of a way by what to do with pumpkin. I just want to combine something for dinner. Most of time I only eat pumpkin was for dessert. Now I have this idea that I have explored around a lot. I came up with this idea called Pumpkin Stuffed Shells.

Here is the recipe for Pumpkin Stuffed Shells:

Ingredients
- tomato sauce (it can be anything, you can do homemade tomato sauce, or using your creative. I used cheat tomato sauce because it make it easier for me)
- 15 oz of canned pumpkin
- 15 oz of ricotta cheese
- 8 oz of mozzarella cheese
- fresh mushroom (sliced)
- onion (use half and chopped)
- tomato (use whole and chopped)
- 1/4 cup of Parmesan cheese
- 1 tsp of garlic powder
- parsley (dried or fresh)
- box of jumbo shell pasta (it will hold 42 shell so it should be enough for your big family)
- 4 tablespoon of butter

Direction
1. Cook the jumbo shell pasta (follow the box direction), because it will take a while to cook and let it cool too.
2. While the jumbo shell pasta are cooking. Saute the mushroom with 4 TBS of butter (I know it is a lot of butter but when you add vegetable, it will be reduced), then add onion and continued to saute for 2 minutes. Then add tomatoes and the juice from tomato will be release so let it boil and then simmer for 5 to 10 minutes.
3. While pasta cooked and the vegetables are simmering. Use medium bowl, add ricotta cheese, Parmesan cheese, garlic powder, and parsley, mixed well all together. When the vegetables are done, separate the mushrooms from onion and tomatoes. Don't use all of the mushroom, only need some of it. Then add the mushrooms in filling and mix well. Then add 1/2 cup of pumpkin in the filling and again mixing well. Save the remaining of pumpkin for later if you want to make cookie or bread or whatever you feel like.
4. When the pasta are done, just drain the water out and let it cool down. Preheat the oven to 350 degree. Using any casserole pan, I used 9x13 inch pan because I have big family. Spray with the can to prevent stick, then add the tomato sauce. Then add the vegetable that you save before and not use all of it.
5. For the shell pasta, add the filling inside. It is a lot of work to do, so if you are ready to get little messy. Be sure that your hands are clean before you add the filling in shell pasta. When you add the filling in the shell pasta and put in pasta. Make sure the open shell, not upside down because it will spread when you put in oven.
6. Add all of the tomato sauce on the top and spread it around. Then add the mozzarella cheese on the top, I ended up use all of it. Then add the remaining of vegetable on the top.
7. Put in the oven and cook for 30 minutes. Then take it out and let it cool for a while.
8. Just enjoy of the every taste you bite, :)


I know the picture on the right are terrible. I had to use my cellphone camera because my digital camera were dying. I had to recharge. It just not enough time for it.

I hope you enjoy this recipe when you cook in the future.


Wednesday, September 26, 2012

Fall is coming...on way to become Chef...

Update with my life over a month...

I have been extremely busy with school, because they gave us a lot of homework that need to be done. It was the speedy five weeks of classes. Now, I have new classes starts on the first week of October and I am taking four classes for 11 weeks for the fall quarter. I passed my TAPS Food handler certification which mean I can cook to general people.

The first class that I took is Purchasing & Product which I learned about the cost of dish to sell to the customers. I had to figure out the cost of the foods to buy and split into the price to make the total for one dish. It was a lot of work to do. I had this big project. It came to end that I finished all of it and got A in this class. I am so happy to pass this class and move on the the next.

The second class that I took is Concept of Theories of Food. This class, I had three exams to complete. I know it is crazy to have three exams for one class but that what it is. The first exam was the vocabulary term that I had to know and learn since those five weeks. Lucky, I passed this vocabulary exam. The next one was the Final Exam of the overall, from the lecture, and the PowerPoint notes that I have learn. I did pass this Final Exam. I never thought that I would pass those exams. Because when I was in college, I tended to fail those exams but still pass the classes because I did not miss the lecture and also turn in the homework on time. But this classes seem to be good for me. The last exam was ServSafe which it was required for everyone to take to pass as to be able to enter the kitchen for the next quarter. I finished this class and got A in it. For that ServSafe, it will take couple of days to know if I have pass or not. But I have the feeling that I will pass this ServSafe exam.

As for this fall is coming...the pumpkin is here. I am so ready to make anything with pumpkin. Pumpkin is the most healthy things you ever eat. Pumpkin just come in with everything from pie to bread to cookie to coffee to shake to ice cream and to everything in it. I really love fall because it is the perfect time of the year with everything. I just love the colors on the tree, the weather, the food, and the activities that you can do.

Keep eye for the recipe that I will be soon blog...

 
That me on way to become chef...
 

Tuesday, July 24, 2012

Speeding up with Cross-stitch 15

Ah!

I finished the part 15 of cross-stitch. I started on July 8th and finished it today on July 24th. I just want to finish it before I am going out of town. I came to realized that I am speeding through the cross-stitch. I know that there are some mistake but you really cannot see it anything.

The outcome that it looked really good. I only have three more parts to go. It will might take a while because I am going back to school soon. So it look like that I won't be able to finish until December or so. But we will see how things goes.

Here is the part 15 of cross-stitch...


The outcome of part 13 to 15 as before three more to go...


Keep eye on the blogs...more will come soon...or later...

Wednesday, July 18, 2012

In healthy way if you want to...

I was cooking dinner. I was tried to think of way to cook little healthy. I did not cook that much for the last two weeks. I was go on easy. Because when you cook, you can easily be burn out and get tired of cooking all the time. That happen to me once a while.

I was explore around on Pinterest.com, I found one good food. I clicked and it is called Slim Potato Casserole. It is same casserole that was family popular food. A little of unhealthy but in good way. For the couple of week, I was craving for potato. I don't think I could survive without potato. Ever since I was little girl, I always love potato. I could live off with them. I mean, I can eat anything that is make of potato. I can go crazy over potato. It was my most favorite food of all the time.

Here is the link for Slim Potato Casserole, however, I did it differently. I do not like Greek Yogurt very much so I replaced with Fat free sour cream. It taste better. Here is the recipe that I used different from her recipe. I was inspire by her.

Twisted Slim Potato Casserole:

1 Large bag (32 oz) frozen shredded hash browns
1 can fat free chicken broth
2 cups fat free sour cream
1 tsp Garlic Powder
1 tsp Onion Powder
1 tsp Black Pepper
1 tsp Italian Seasoning (or 1/3 tsp each of basil, parsley and oregano)
Salt and Pepper to taste
1 cup Shredded Cheddar (or any other cheese of choice)

Directions:

Preheat oven to 350 degrees. In a large bowl, combine all of the ingredients until well incorporated. Spray a 9 X 13 inch baking pan with cooking spray. Spread potato mixture evenly in baking pan. Place in oven and cook for 45 minutes or until bubbly.


There is another recipe that I just created it on my own. I add some meat to the dinner. I am sure it can be use any of meat like chicken, beef, or pork. I used pork chop, boneless. I used it on the grill because it came out really good. Here is the recipe for it.

Sweet & Zing Pork Chop

2 Tablespoon Worcestershire sauce
1 Tablespoon pomegranate vinegar
1 Teaspoon Italian seasoning
1 Teaspoon Oregano
1 Teaspoon Mediterranean Herb (can be found in store)
1/4 Teaspoon Onion Powder
Salt and Pepper
Zip lock bag
Any size of pork chop (I used 4 oz which is one for each person)

Mixed all together as whisk. Put the pork chops in zip lock bag. Pour the marinate sauce in the zip lock bag. And put in fridge and marinate for 1 to 2 hours. Then start up the grill and cook for 30 minutes or more until the meat are done. Enjoy!


Hope you enjoy this delicious dinner!

Sunday, July 8, 2012

Fall in love with Summer Pie

In the middle of summer, I was really in mood for pie. I always love the pies since I was little girl. My grandma or my mom will make those pies. It can be anything from apple to cherry to blueberry to mixed berry and to lemon meringue pie.

Lemon meringue pie is always my favorite. It can be easy or hard. It took me a lot of practice to make it into perfect pie. I did it last year and it ended really good. Now, I was thinking of add something in lemon meringue pie. I decided to add the raspberry in it.

I did everything in progress. You can find in my other blog...Fresh Lemon pie

But I will put it up again so that you will know the next....

Fresh Lemon Pie (with hint of raspberry)

1 1/2 cup of sugar
1/4 cup cornstarch
1/2 cup cold water
1/2 cup fresh squeezed lemon juice (you can add more for more flavor)
4 eggs yolks, beaten
1 1/2 cup boiling water
1 - 9 inch baked pie shell
1/4 teaspoon salt
2 tablespoon butter
1 cup of fresh raspberry or any berry
For Meringue only:
4 eggs whites
1/4 teaspoon cream of tartar
6 Tablespoon sugar

Combine sugar, cornstarch, and salt. Gradually stir in cold water and lemon juice. Blend in egg yolks; add butter and boiling water. Bring to boil, stirring constantly until mixture thickens. While it was boiling, I add the raspberry into it. (It will change the color so it won't look like lemon pie. But it came really good and looks great.) Pour into baked pie shell.

TIPS: I mixed all of the ingredient and then I pour it into the pan to bring it boil and also stir it more often.

For Meringue:
Beat egg whites until foamy; add cream tartar and 1 tablespoon of sugar at a time until whites are stiff. Put meringue on hot filling and bake at 350 F degree for 12 to 15 minutes.

The moment that I taste it, it is so good. You could taste the lemon first and then burst of raspberry. I enjoyed it a lot.


I hope you enjoyed it!

Saturday, July 7, 2012

At last, Cross-stitch Part 14

Finally, I started the cross-stitch part 14 and had it finish today. I know that it had been a while. Because I took a week off to visit my friend. Also it is best thing for me to have little break from it.

So I started part 14 on June 17th. Now I finished it today on July 7th. It seem a lot short than it was before. This part was hard because it had so many details on it. But I have the feeling that three or four more to go will be little easier. I am hoping to finish it before I go back to school but I doubt it.

Because it will take me a while because I tend to do those part per month. But we will have to wait and see about it.

Here is part 14 of cross-stitch...

Friday, July 6, 2012

Go for a career change


I graduated from college with Bachelor’s degree of Liberal Arts. I went to Ireland for two months for internship program to gain experience for my degree. I decided to take a year break from school and started to look for jobs. Mostly my dream jobs were working in the museum, anywhere. I don’t mind to work in small museum to large museum, unknown museum to well-known museum. I just want to work in museum because I love to work with artifacts and documents. I believe that they are the most amazing things that can be found and find the truth about our past.

I have searched many different jobs over a year. I applied hundreds and hundreds of them. I have traveled to other states to take test that is required for this position. However, I get a lot of rejects as almost every job. I grew frustrated with it. I started to wonder if I made the wrong choice by going to college and study History as results to lead to get my Bachelor degree. I often felt that I am wasting my four year of college that seems to be worthless. Currently, I am in huge amount of student loan debts. I am starting to struggle to pay back. I have decided to look through different jobs because I had no choice. And yet, I get more rejects because I have too much experience. I felt like I am in the middle of something. But I rethink, I did not waste my four years of college to study History. I will find a way to use my Bachelor degree.

Over a year, I started to explore little more. I found out that I do have my passion for cooking. Mostly of time, it was art and craft. But I love cooking the most. I looked around and try to find school for cooking. I found one that I really like. It was the Art Institute. It was well-known school all over. I applied and want to explore their programs and made the decision by what I really want. I have planned this since May. I made appointment to meet this person, the assistant director of school. I explored their programs and I really like it. I found out myself that I really like cooking so I applied for Culinary Arts. Because I always want to start my own business as start my own restaurant. At last, I have been accepted.

I am not going to waste my Bachelor’s degree. I will find a way to use it. Maybe in the future, that I will open restaurant and bookstore. Or I can create the history in the restaurant. Who know what the future will hold for me. We will have to wait and see how things go for me.

Saturday, June 9, 2012

Part 13 of Cross-stitch

Ah! It came to the last section of the cross-stitch. Right now, it is part 13 of cross-stitch and it is only 5 or 6 more parts of cross-stitch. I had to start new cross-stitch fabric because the one I did from part 1 to 12. The bottom was not enough room. So I had to create the last section of bottom on new fabric. Then later, I will be rejoin them together when it is come to finish.

This part 13 was not the easy thing to do. Because it had so many details in it. I did had few mess up but it look good. I started on this on May 15 and I did had few day off. Because I was gone vacation for a while and also I had a lot of appointment related with jobs. I have not found job yet but not giving up any hope to find job soon. I really want to finish it before I go visiting my friend for a week. So I did finish it today. It was really record of my time, but really I did one hour of it during the night before the sun goes down. It did not get dark around 9 pm. But I did success it anyway.

Here is the image of part 13...


So you see this and later will be more to come. I have this feeling that I will get all done around in Oct or Nov. Because it is summer time, which mean a lot of vacation time or a lot of fun time with family, and include a lot of appointment. So it will take a long time to get it done.

Keep eye out for part 14 in next month...

Wednesday, May 16, 2012

To Cupcake or not to Cupcake

To Cupcake or not to Cupcake, that is the question....I was incredible in mood to cook dessert and decorate with something on the top. While I was cooking dinner and I had extra zucchini. I was not sure what I really want to do with it. I remember that I bought blackberry. I was wondering if I could make zucchini and blackberry bread. But I was like, it is too simple for that.

I decided to research  and surf on Internet to get some idea. I came across to this Pinterest.com and explore. I know that people always like to post and share with people with the new ideas of everything. I found some interesting that I want to try. Then it started to come in my mind with many different thing. The first thing that I found was called Zucchini Raspberry cupcakes. Here is the website if you want to make: Zucchini Raspberry Cupcakes .

I found that few things that I don't have. So I decided to change it up and make it my own by what I have in the kitchen. Then I changed it to make it into my own. I called it CZB cupcake. It stand for Chocolate Zucchini Blackberry cupcake. I made it and in result it came out really great. I had this great idea is to put a single blackberry and put in the middle. So it came out really good. Here is my recipe that I want to share with you.

CZB cupcake

Ingredients:
- 2 1/2 cups flour (any will be fine)
- 1/4 cup cocoa powder
- 1 1/2 teaspoon baking soda
- 3/4 cup butter, softened
- 1 cup white sugar
- 2 eggs
- 1 teaspoon vanilla extract
- 1/2 cup milk
- 2 cups shredded zucchini
- 1/2 cups blackberry (I suggest you to cut it half to make it easier)
- keep 24 blackberry

Directions:
1. Preheat oven to 350 F degree. Grease 24 muffin cups or use the muffin tin.
2. Whisk together the flour, cocoa, and baking soda in medium bowl, set aside. Beat the butter and sugar with an electric mixer in low speed in large bowl until lightly-colored and fluffy. Add eggs one at a time, allowing each eggs to blend into the butter mixture before adding the next. Beat into the vanilla with the last egg.
3. Add half of the flour mixture in the butter mixture. Beat in low speed to mix it evenly. Then add all of the flour mixture and add milk. Beat in low speed for two minutes. Then take spoon and mix it, until it is all blend.
4. Add the zucchini and blackberry, fold it and mixing just enough to evenly combine. Spoon the butter into muffin cups, filling each 3/4 full. Then put the single whole blackberry in the middle and put in but not all the while, just the top of it.
5. Put in oven and cook for 20 minutes, use toothpick to make sure it came out clean. Then cool off for half hour.


You can see those cupcake have blackberry in the middle, it is cool idea to do that.

While, it is cool off. I found out that I do not have any frosting so I decided to do homemade frosting. It is not quite easy as it does. There is many different website that you could find. It is quite challenge for me to do because I did not want to use one ingredient too much so I just want to limit it. But at least it came out really good. I also add lemon juice in it and it taste really good. You can add anything in the frosting as flavor or food color. So I made lemon frosting to add on CZB cupcake. I did homemade frosting but it turned into icing because of the lemon juice that could cause it into glaze but it taste amazing.


Even you can put inside and it will make it even more amazing taste. I did taste it for myself. You can taste the blackberry mixed with lemon. It is so good. See the inside of cupcake, you could see little bit of blackberry. I guess I put the inside of icing in different place but it does not matter anyway. Just be creative!


Part Twelve of Cross-stitch

It came again with the cross-stitch part 12, it was only short part to add on the end of it. It took me a week to finish it up. I started on May 10 and finished today. So it was easy and also I finally found the color that I need and I quickly grab one. Because it was the last one. I don't know why that specific color is always run out. I just need that color for my cross-stitch project. So I was glad to get it.

Here is the part 12, just short version.


Also the whole thing from part 1 to part 12, it came out really good. But there is still more to go. I have the last bottom part to get it done. So it look like it will take me a while to get it done. So it look like it will take another three to four months to get the bottom part done. But the overall, it looked really good.

Here is the whole thing from part 1 to part 12...


It is amazing how far I have come. I started the cross-stitch part one and got it done on October 11, 2011. Then I finished all of part 1 to 6 on January 15, 2012. It is really amazing by how much patience that I took to get it perfect and look beautiful. Then later one, I start on part 7 and got it done on February 12, 2012. Then I finished all of part 7 to 12 from the beginning of February to May. So the the last part will be start on part 13 to 18. It look like it will take me three to four months to finish the bottom part. It look like the whole thing will be done in August or September.

Don't worry, I will keep you update with the part of cross-stitch and maybe the last three that I will might not post on it. But we will see about it.

Enjoy!

Wednesday, May 9, 2012

The Result of Cross-stitch Part 11

It came to the result of cross-stitch part 11...I am sure you are surprised how quick I was able to finish it. Well, this part was easy to do because it does not require a lot of details on it. I know that I start on April 23 and finished on May 9th. I only had four days off with this cross-stitch when I went on vacation.

But in the result that it look really great. While I was doing this cross-stitch, I did not have one color that I really need. But it came in luck that I found in my bag with other colors. But at first, I was not sure if it was this right color. I decided to go to the store today and hope to get that color. However, it was sold out. But I noticed the color on the image and I knew it was the right color. So I sew it up with that color and it does look just right.

So the part 12 will be coming very soon because it is only short side on it. You will see on the next image of it. Here is two image of it. Enjoy!

This part that I sew it before I had it put it together. The reason I sew it separately because it was not enough room so I had to sew it.


This image, it was not easy thing to do by sew it together so I did it my best, but it came out look good.


Tuesday, May 8, 2012

Summer is coming soon...

Summer is coming soon...I hardly can't wait for it...I was mood for summer food from those long winter time...

I went to the store yesterday and get supplies for the week and dinner on Wednesday night. I saw the poppy seed in spice aisle. I never thought how much I really love poppy seed. I just don't know why but I cannot explain the taste of it. I do not know what to cook with poppy seed. I was really mood for summer dessert or breakfast. Whatever you wish for. I came across to this pinterest.com and one image came up in my sight. It was the poppy seed bread, but later I saw the lemon poppy seed bread. I click to one of their image to get the recipe and I saw that it was kind of complication to do those things. However, I remember that I made Lemon bread two year ago. I decided to give a try with my own recipe. I made it and baked it. It did came out really good. I really love it a lot.

The lemon poppy seed bread is very simple and easy to do. Here is the recipe:

Lemon Poppy Seed Bread


Ingredients:
- 1/2 cup butter (softened)
- 1 cup sugar
- 2 eggs
- 2 TBS lemon juice (fresh or not)
- 1 TBS grated lemon peel
- 1 1/2 cup flour
- 1 tsp baking powder
- 1/8 tsp salt
- 1/2 cup milk

Glaze:
- 2 TBS lemon juice
- 1/2 cup confectioners' sugar

Directions:
1. Preheat at 350 F degree
2. In big bowl, add butter (softened) and sugar, mix together until cream. Then add the eggs, lemon juice, and grated lemon peel and beat all together.
3. In small bowl, add flour, baking powder, and salt; stir together and then add into cream mixture with milk
4. Pour into greased loaf pan and bake for 45 minutes.
5. While waiting for bread to be baked, mix the lemon juice and confectioners' sugar together.
6. Take the bread out when it is done and quickly add glaze on top of bread soon as the bread came out of oven.
7. Let it set to cool it off and Enjoy!


Sunday, April 22, 2012

Cross-stitch Part 10

Come at last with Part 10...I started on this part 10 on March 28, however, I become lose interest in it. I did not work on it that much of it. But until last week, I was bored and decided to go back to start cross-stitch. I thought that I would not finish before that date to make it into every month to finish one part.

However, I did finished it much earlier than it was. I did finish it today April 22 so it was pretty much earlier. Maybe, I become more of speed cross-stitch because my skills have been improved a lot.

Now, I will be start focus on part 11 tomorrow, and there are still about 9 or 10 parts left to go or maybe less than that.

Here is my part 10 cross-stitch...


And here is the whole thing....


Tuesday, March 27, 2012

Part 9 of Cross-stitch

Here I am again with my cross-stitch project, I am finished with part 9. There is still more to go and I think I have 7 or 8 parts to go. This part 9, I have took a break for a while because I ended up get a lot of needle point in my fingers but not too bad. Also sometime, I just need to give my hands a break because it is a lot of work to go and also let my eye rest too. But the results that it look amazing and it start to become more clear with the image. I really enjoyed this project a lot. Here is the image of Part 9 and more will to come.


You could see the part 9 had been to add and here is another image of the whole thing of cross-stitch...